Starlink Roof Mount in Sydney: How to Install Without Damaging Your Roof
Listen to the minisode.
Sydney’s internet dead zones are shrinking fast, and Starlink’s a big reason why. However, installing it at a sufficient height to receive a good reception signal requires placing it on top of your roof — and that can create a lot of problems in a hurry. Drill the wrong hole, select the wrong sealant or choose the wrong mount type for your roof, and you will be facing leaks, rust and a lost roof warranty.
Let’s have a look at the different types of mounts available, the things that can go wrong with a do-it-yourself mount, and how you can avoid a headache when you go with a roof mount!
The Three Main Mount Types
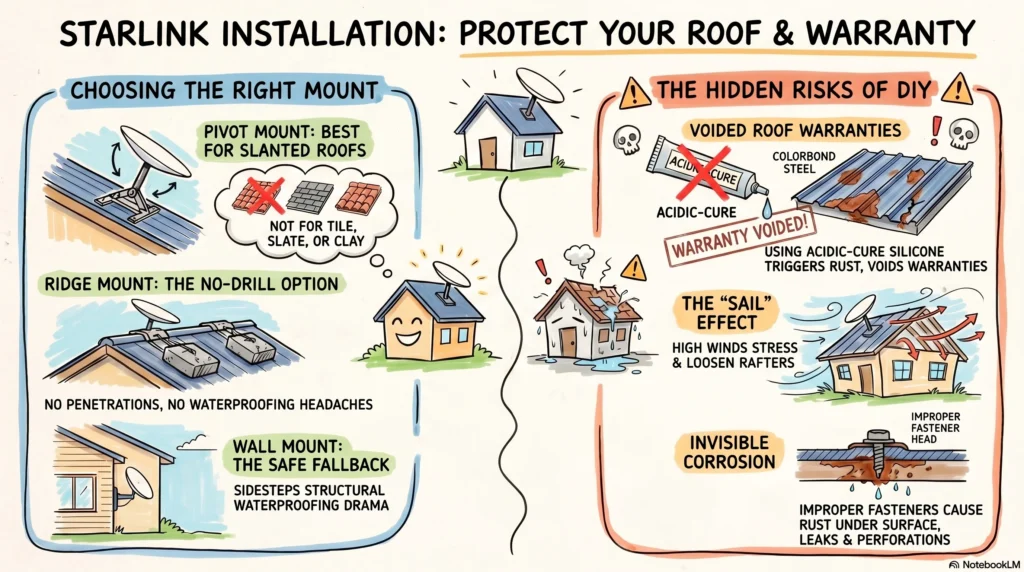
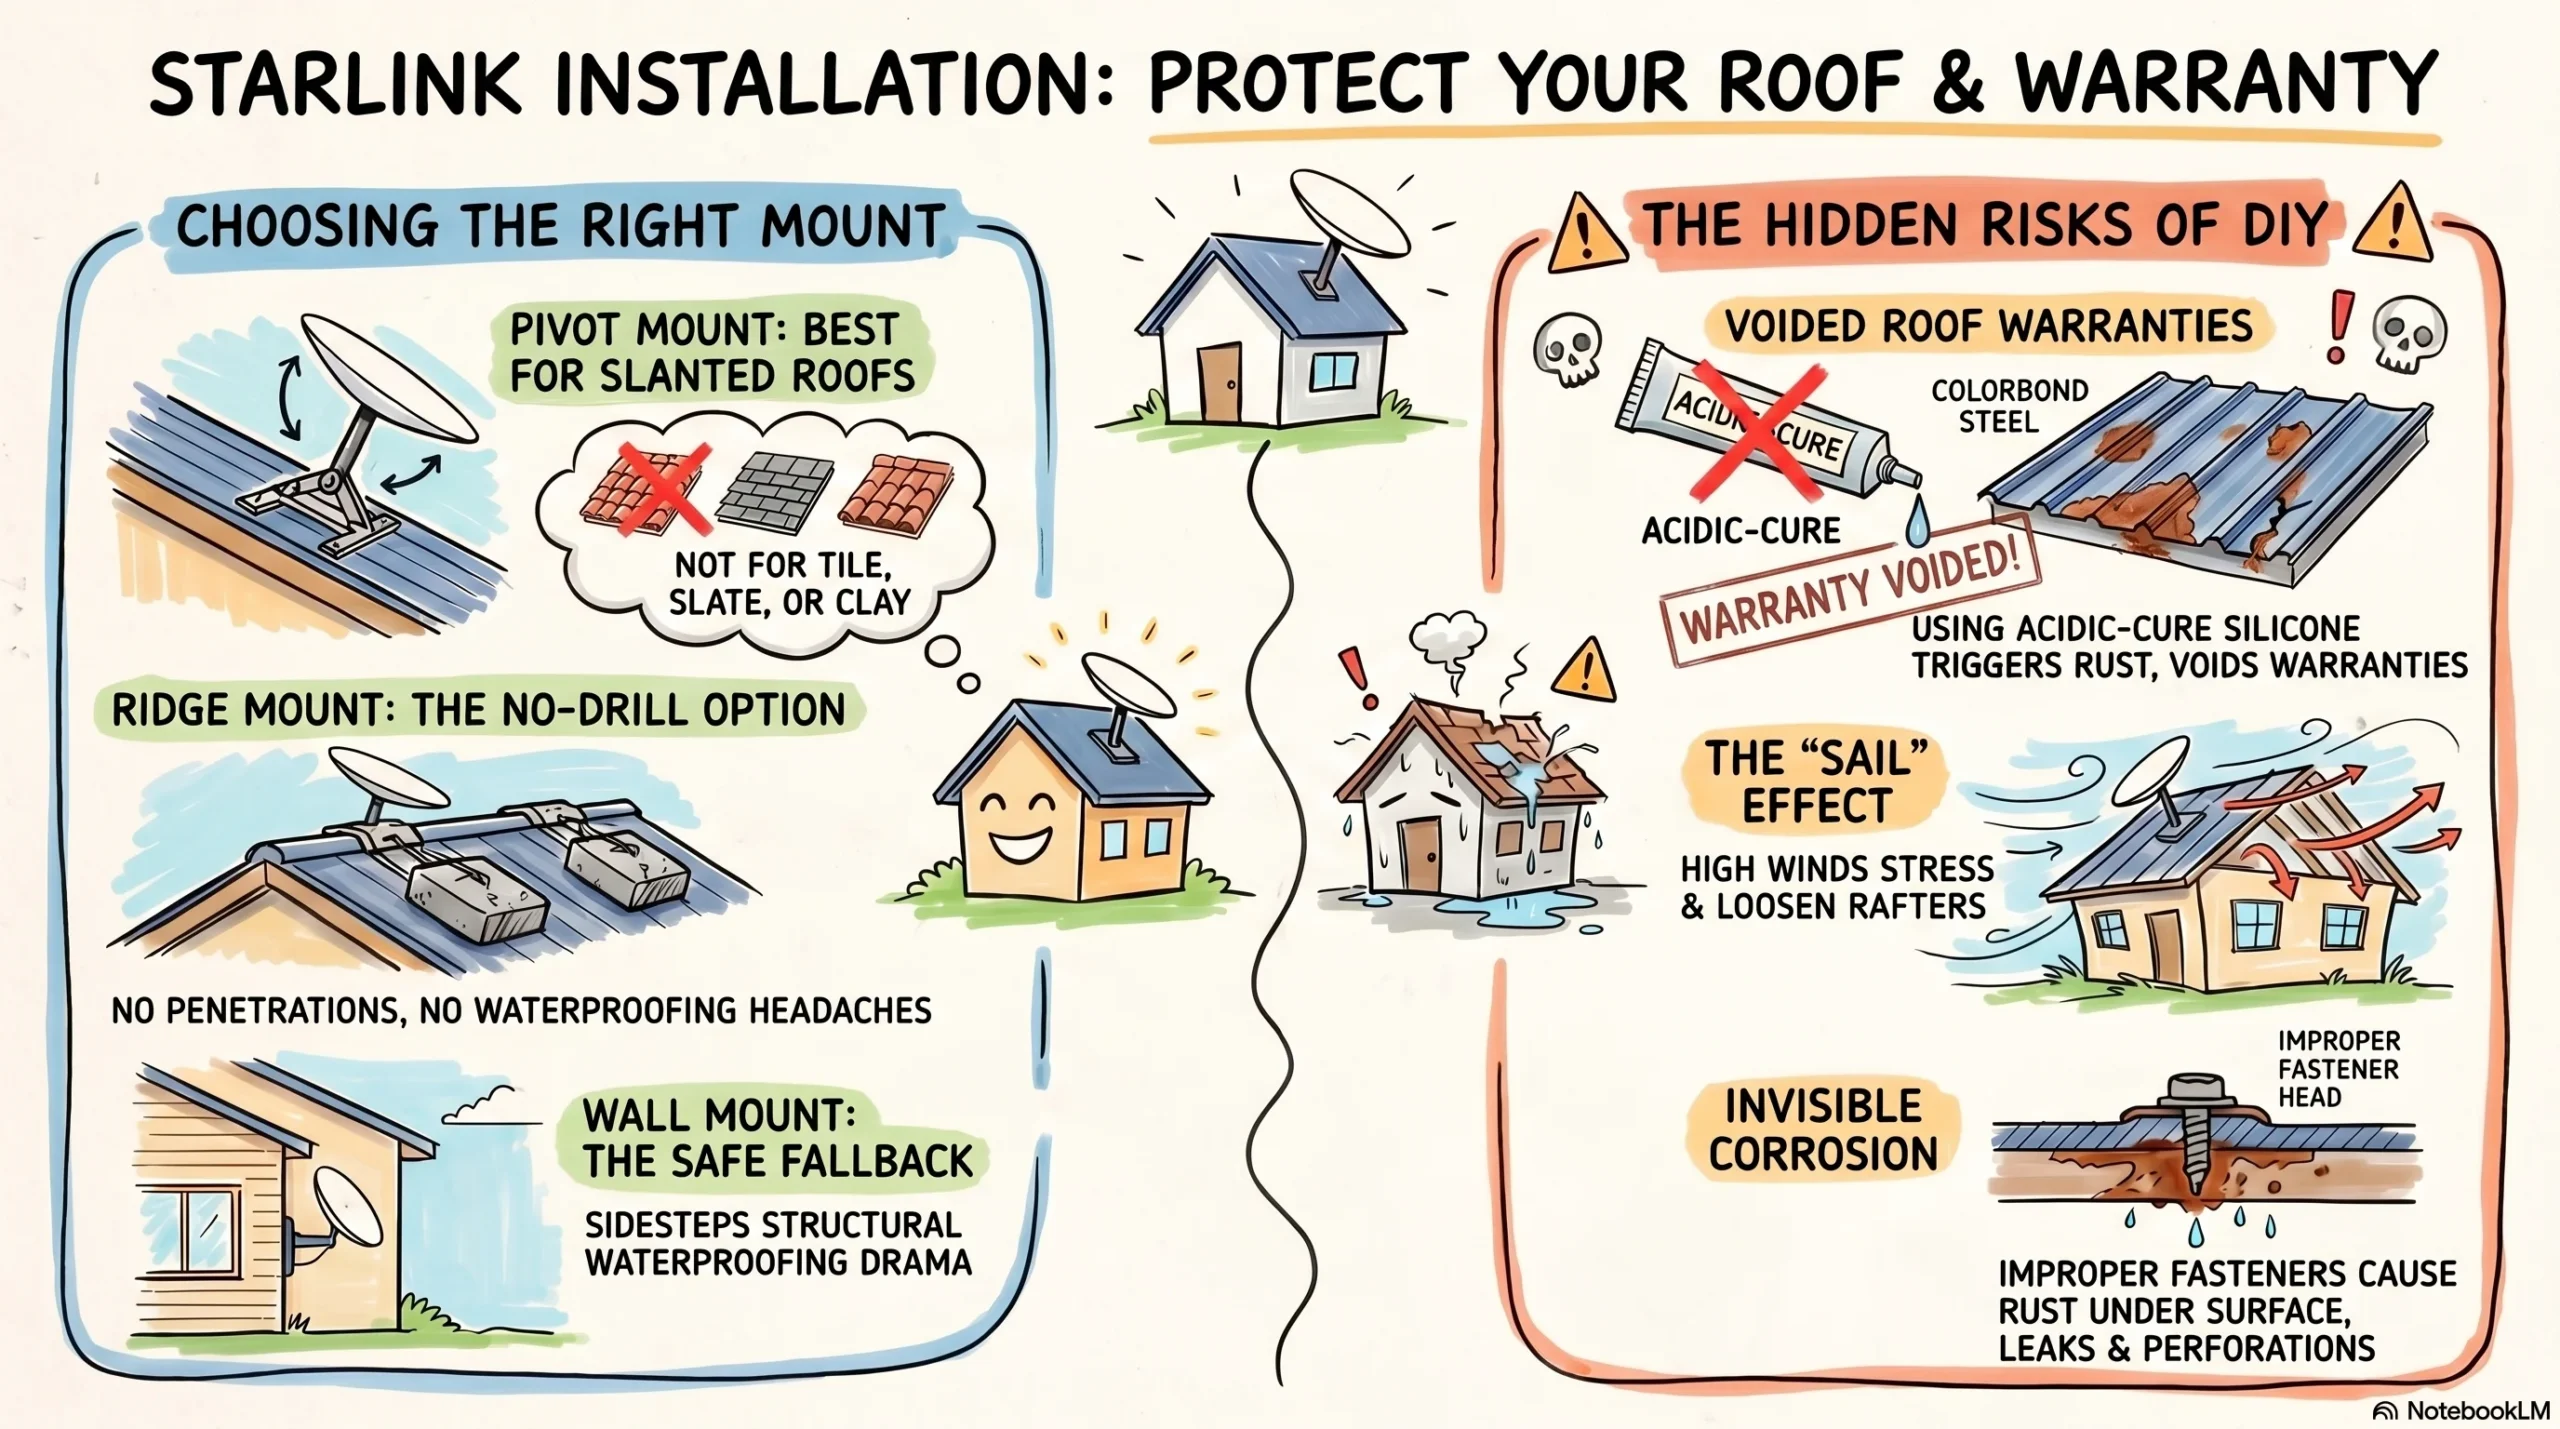
1. Pivot Mount
The Pivot Mount is Starlink’s official option for slanted roofs — think shingles or metal sheeting. It’s adjustable, meaning that you can tilt the dish vertically, no matter what the pitch of your roof is. The kit includes lag screws and mastic tape to seal.
The downside: Starlink explicitly states that it is not recommended for tile, slate or clay roofs. The mounting base is on the roof surface, and the tile does not provide a flat and stable bed. The screws may fracture the tiles, and the seal won’t seal correctly on irregular surfaces.
2. Ridge Mount
The Ridge Mount is located on the top of your roof (the ridgeline) and attaches with ballast weights, rather than drilling into the structure. The blocks in the official build of Starlink are concrete blocks used to hold it down. No holes. No penetrations. No waterproofing headaches.
The catch: It’s visible. You’ve got a dish and concrete blocks sitting on your roofline, and in Sydney’s wind, it needs serious weight to stay put. Not ideal if you’re in a high-wind corridor or your roof ridge is narrow. Also, routing the cable cleanly can be tricky since you’re not penetrating the roof — you need another entry point.
3. Wall Mount
If your roof’s problematic — tile, fragile, or just not structurally suitable — the wall mount is your fallback. Starlink sells short and long versions depending on your roof overhang. Drills into the wall, not the roof, so you sidestep all the waterproofing drama.
Works for: Brick, timber, or fibre cement walls with minimal obstructions nearby.
The catch: Lower height means a greater chance of tree or fence interference. The Starlink app will tell you pretty quickly if a wall position is going to work. If you’ve got a large roof overhang, the standard wall mount might not clear it — you’ll need the long version.
Why DIY Roof Mounting Is Risky
Plenty of Sydney homeowners look at a Starlink roof mount and think, “It’s just a few screws.” It’s not. Here’s what actually goes wrong.
1. Voiding Your Roof Warranty
Most roofing warranties — especially Colorbond — are conditional on proper installation and maintenance. Drill a hole through your roof sheeting, fail to seal it correctly, or use the wrong sealant, and you’ve just handed your warranty provider a reason to reject any future claim.
Colorbond specifically warns against acidic-cure silicone. Use it on their steel, and you can void the warranty and trigger premature rust. That’s not a small print thing — it’s a real problem that shows up two or three years later when the roof starts bleeding rust streaks around your mount.
2. Creating Leaks That Travel
Water doesn’t drip straight down. It runs along battens, tracks behind flashings, and drips out metres from where it entered. A poorly sealed Starlink roof mount on a Sydney roof during an east coast low or a summer storm can send water into your ceiling cavity for weeks before you see a stain.
The worst part? When you finally start noticing it, repairing is not the option anymore. At that point, you’re calling roof repairs Sydney specialists to fix damage that could have been avoided with proper installation.
3. Rust From the Inside Out
Metal roofs (Colorbond, Zincalume) are protected. If you put that coating on with a poorly seated screw or if you use a fastener which is not corrosion resistant, moisture will get to the steel substrate. Rust starts under the surface where you can’t see it. It spreads. Eventually, the sheet perforates, and you’ve got a leak that has nothing to do with the original mount hole.
Tile roofs have their own version of this. Crack a tile during installation, and water gets through the break, runs down the tile channel, and into the sarking or ceiling.
4. Structural Damage
A Starlink roof mount dish doesn’t weigh much — maybe 5kg. But in the wind, it catches air like a sail. A mount fixed to a single rafter or purlin can stress that point, loosen over time, and wobble. Wobbling enlarges the screw holes. Enlarged holes leak. Worse, if the mount pulls out completely in a storm, it takes a chunk of the roof with it.
Ridge mounts avoid the drilling problem but introduce another: ballast weight on your ridge. Sydney roofs aren’t engineered for point loads on the peak. Too much weight, or weight that shifts, can crack ridge capping or compress the roof structure.
What Proper Waterproofing Actually Looks Like
Any hole in a roof is a potential leak. The difference between a mount that holds for twenty years and one that fails in the first winter is the sealing detail.
For Metal Roofs
Use corrosion-resistant clamps or brackets designed for your specific profile — Trimdek, Kliplok, corrugated. The mount needs to grip without crushing the ribs or scratching the coating. Sealant goes under the base and around every fastener. Not just any sealant: neutral-cure silicone compatible with Colorbond, or proper mastic tape designed for roofing applications.
For Tile Roofs
Tile roofs need a different approach. You can’t just screw into a tile — it’ll crack. Proper tile mounts slip under the tile and fix to the batten below. Or use a ridge mount that sits on the peak without touching the tiles. If you must drill through, pull the tile off first, seal the hole, then bed the tile back in cement.
How Professional Installers Handle It
They verify the roof structure, roof type, wind zone, and cable run before they pick up a drill.
1. Structural check
What is the location of the rafters/purlins? Only attaching to the roof sheet isn’t a good idea, as the sheet will flex, the screws will loosen, and the seal will break.
The material would be decided after the complete assessment of the roof. A professional will know which types of brackets and sealants to use and will have experience with the method that will work best for your roof.
2. Wind loading
Sydney’s coastal and exposed areas see serious wind. The mount needs to handle not just the dish weight but the dynamic load when a southerly buster hits. That means proper fasteners, adequate embedment depth, and sometimes additional bracing.
3. Cable routing
The cleanest way is through a vent, wall cavity, or a hole drilled in the wall — not the roof. It gives a clean outlook.
4. Warranty protection
A professional installer knows which sealants are compatible with which roof materials. They know that acidic-cure silicone kills Colorbond warranties. They know that a proper job means your roof warranty stays intact and their own workmanship warranty covers the installation.
FAQ: What Sydney Homeowners Ask
Can I install Starlink on a tile roof myself?
You can try, but it’s risky. Tiles break very easily when pressure is applied to them pointwise. This is done by either a non-penetrating ridge mount or a bracket that attaches to the batten below the tile.
Will drilling holes for a Starlink mount void my roof warranty?
It depends on your roof material and warranty terms. Colorbond warranties can be voided by improper sealants or installation methods. Tile roof warranties often specify that only qualified tradespeople should penetrate the roof surface. Check your warranty documents before you drill.
What’s the safest mount type for avoiding leaks?
The Ridge Mount — the ballast-weight style — avoids roof penetrations entirely. No holes, no sealant, no leak risk from the mount itself. The trade-off is aesthetics and the need for a separate cable entry point. For penetrative mounts, the Flashing Mount (used with a Pivot Mount) gives the best waterproofing if installed correctly.
Can I move the dish later if I change my mind?
Pivot and wall mounts leave holes that need proper patching — sealant, maybe a colour-matched roof screw in the old hole, and a check that the surrounding area isn’t damaged. Ridge mounts just lift off, but you’ll still have the cable entry to deal with. Plan your position properly from the start using the Starlink app’s obstruction scan.
What if I already have a leak after a DIY install?
First, determine if it is the mount or something else. Water moves, so there may be a different layout of the stain on the dish. Hire a professional roofer to check (not the Starlink installer — real roofer who knows their roof type).
Is a wall mount better than a roof mount?
If your wall position gives a clear northern sky view and you’re not dealing with heavy overhangs, yes — it’s simpler, less leak risk, and easier to access for maintenance. But walls are lower, so obstructions matter more. Use the Starlink app to check before you commit.
What sealant should I use on a Colorbond roof?
Neutral-cure silicone only. Acid-cure silicone reacts with the metallic coating and voids warranties. If you’re not sure what you’ve got, check the tube — it’ll say “neutral cure” or “acetic cure.” When in doubt, use a roofing-specific product from a supplier who knows Colorbond.
Final Word
Getting Starlink on your roof in Sydney isn’t complicated, but it’s not a Saturday afternoon job with a cordless drill and a tube of silicone from the garage. The mount type needs to suit your roof. The sealing needs to suit your roof material. And the installation needs to protect both your internet signal and your roof warranty.
Do it wrong, and you’re looking at rust, leaks, and warranty fights. Do it right — or pay someone who knows how — and the dish sits there for years, doing its job, while your roof keeps doing its.
To save yourself from the bigger hassle, it is totally recommended to have regular roof maintenance before it turns into costly damage. If your laziness has finally led you to costly repairs, it is recommended to hire Sydney roof experts who can understand the structural mounts as per the local weather and make your investment worth it.